¶依赖
- Elasticsearch
- ISO8601 or Unix timestamped data
- Python 3.6
- pip, see requirements.txt
- Packages on Ubuntu 14.x: python-pip python-dev libffi-dev libssl-dev
ElastAlert 在 0.2.0 相较于 0.1.x 版本升级到了 Python3,且 requirements.txt 文件中强制依赖 elasticsearch 7 。
在 changlog 中截止到当前最新的 0.2.4 版本没有增加很多特性。不过经测试即使本地安装的 elasticsearch python 客户端模块不是 7.x 也是可以兼容查询的。
需要注意的是无论任何版本 ElastAlert 不支持
doc_type字段查询
¶下载与配置
¶pip安装
你可以通过 pip 安装最新的 released 版本的 ElastAlert :
$ pip3 install elastalert
¶源代码安装
这里安装官方文档的源代码安装进行实操
请注意你的环境是否携带了多版本的 Python 环境,
pip指向的是不是正确版本的 python,例如要运行的 ElastAlert 是0.2.x 版本的,需要 Python 是 3.x 及其对应的pip包管理器
或者从仓库克隆当前的最新代码:
$ git clone https://github.com/Yelp/elastalert.git
然后通过 setuptools 工具运行官方提供的 setup.py 进行安装:
$ pip3 install "setuptools>=11.3"
$ python3 setup.py install
取决于 Elasticsearch 的版本, 你可能需要手安装正确版本的 elasticsearch-py (ES 官方提供的 Python 客户端)(虽然 requirements.txt 里面写死了版本是 7).
Elasticsearch 5.0+:
$ pip3 install "elasticsearch>=5.0.0"
Elasticsearch 2.X:
$ pip3 install "elasticsearch<3.0.0"
¶配置
下一步,打开 config.yaml 示例文件。你会在文件中看到几个配置选项。
# ElastAlert 加载规则文件的路径,如果里面没有任何有效规则配置文件,ElastAlert 将不能启动,同时 ElastAlert
# 会监视这个路径进行热重载,这里使用 example_rules 相对路径文件夹名称
rules_folder: example_rules

# ElastAlert 轮询 ES 间隔,覆盖全局 config.yaml 配置文件
# 单位从 weeks 到 seconds
run_every:
  minutes: 1

# 对 ES 的查询窗口,覆盖全局 config.yaml 配置文件,use_count_query和use_terms_query被设置的时候无效
buffer_time:
  minutes: 15

# ES 集群地址,会写入一些轮询、告警、错误元信息
es_host: elasticsearch.example.com

# ES 集群端口
es_port: 9200

# 上面提到的 ElastAlert 写入信息的索引名称,使用 elastalert-create-index 创建 mapping
writeback_index: elastalert_status

# 告警失败后的重试窗口
alert_time_limit:
  days: 2

# 其它非必要参数已删除
¶配置 ES
ElastAlert 会将它的 ES 查询和告警的信息和元数据回写到 ES 中。这对于审计、调试是很有用的,同时它允许 ElastAlert 在重启后准确地恢复到停止之前的状态。这对于 ElastAlert 的运行来说不是必要的,不过是强烈建议的。
第一步,我们需要通过运行 elastalert-create-index 命令来为 ElastAlert 创建索引:
[root@izwz920kp0myp15p982vp4z elastalert]# elastalert-create-index
Elastic Version: 7.1.0
Reading Elastic 6 index mappings:
Reading index mapping 'es_mappings/6/silence.json'
Reading index mapping 'es_mappings/6/elastalert_status.json'
Reading index mapping 'es_mappings/6/elastalert.json'
Reading index mapping 'es_mappings/6/past_elastalert.json'
Reading index mapping 'es_mappings/6/elastalert_error.json'
New index elastalert_status created
Done!
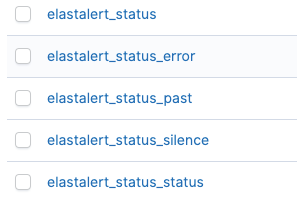
创建了以下索引
¶创建一个规则
每个 规则 配置文件中定义了一个要执行的查询, 触发匹配的参数, 以及一个当匹配发生的时候会被激活的告警器列表. 下面使用 example_rules/example_frequency.yaml 作为一个模板:
# From example_rules/example_frequency.yaml

# 要轮询的 es 地址和端口
es_host: elasticsearch.example.com
es_port: 9200
# 唯一的规则名称,如果发生重名 ElastAlert 将无法启动
name: Example rule
# 每个规则都会有一个类型,不同的类型会有不同的参数设置
# frequence 类型表示在 timeframe 之内超过 num_events 数量的时候进行告警
type: frequency
# 查询的 ES 索引(ES 查询天然支持通配符)。如果你使用 Logstash,可以使用如下配置
index: logstash-*
num_events: 50
timeframe:
    hours: 4
# filter 是一个 ES filter 查询集合。如果没有想要设置的 filter,应该被设置为一个空 list,如 filter: []
filter:
- term:
    some_field: "some_value"
# alert 是一个告警器列表。email alert 需要一个 SMTP 服务器来发送邮件。默认它会尝试连接 localhost,使用 smtp_host 进行修改
# 暂时没有看到修改 smtp 服务端口的选项,qq 端口是 465
alert:
- "email"
# email 是一个告警器发送告警邮件的地址列表
email:
- "707845008@qq.com"
smtp_host: smtp.qq.com
# 修改查询时间格式为 unix 毫秒时间戳。一定要注意看你的 ES 里面的时间戳字段是什么类型的,否则将无法匹配
# 这里考虑到是测试和可读性,使用默认的 ISO8601 时间戳
# timestamp_type: unix_ms
重要:
**所有日志文档必须拥有一个 timestamp 字段(一直提到的轮询窗口就是基于这个字段做的 range query). ElastAlert 默认使用
@timestamp, 可以通过timestamp_field选项改变. **默认情况下 ElastAlert 使用 ISO8601 时间戳, unix 时间戳可以通过
timestamp_type修改(当然也可以修改为其它,具体的参考配置列表章节).
最终这个规则表示 “当在 4 小时内出现 50 个文档的 some_field 字段值为 some_value 的时候发送一个邮件到 707845008@qq.com".
¶检测你的规则配置
运行 elastalert-test-rule 工具将会检测你的配置文件是否可以成功加载:
$ elastalert-test-rule example_rules/example_frequency.yaml
如果你想定义一个要使用的配置文件,可以使用 config 选项:
$ elastalert-test-rule --config <path-to-config-file> example_rules/example_frequency.yaml
配置选项加载顺序如下:
- 在规则 yaml 文件中加载
- 在 config 文件中加载(如果指定)
- 使用内省设置
¶运行 ElastAlert
有两种方式可以运行 ElastAlert. 通过 Supervisor (http://supervisord.org/) 作为一个守护进程, 或者直接由 Python 运行. 在这里为了调试建议, 直接使用 python 直接:
$ python -m elastalert.elastalert --verbose --rule example_frequency.yaml  # or use the entry point: elastalert --verbose --rule ...
No handlers could be found for logger "Elasticsearch"
INFO:root:Queried rule Example rule from 1-15 14:22 PST to 1-15 15:07 PST: 5 hits
INFO:Elasticsearch:POST http://elasticsearch.example.com:14900/elastalert_status/elastalert_status?op_type=create [status:201 request:0.025s]
INFO:root:Ran Example rule from 1-15 14:22 PST to 1-15 15:07 PST: 5 query hits (0 already seen), 0 matches, 0 alerts sent
INFO:root:Sleeping for 297 seconds
ElastAlert 使用了 python 的日志系统, --verbose 设置显示 INFO 级别信息. --rule example_frequency.yaml 指定要执行的日志, 否则 ElastAlert 将会加载在 example_rules 文件夹中的其它规则文件.
让我们分解一下响应信息看看发生了什么.
Queried rule Example rule from 1-15 14:22 PST to 1-15 15:07 PST: 5 hits
ElastAlert 定期查询最近 buffer_time (default 45 minutes) 时间窗内的匹配 filters 的数据. 可以看到命中了 5 条.
POST http://elasticsearch.example.com:14900/elastalert_status/elastalert_status?op_type=create [status:201 request:0.025s]
上面这行显示了 ElastAlert 上传了一个关于刚刚发出的查询的信息文档到 elastalert_status 索引.
Ran Example rule from 1-15 14:22 PST to 1-15 15:07 PST: 5 query hits (0 already seen), 0 matches, 0 alerts sent
上面这行意味着 ElastAlert 已经完成了规则 处理. 对于一个大时间区间, 有时会执行多个查询,但是它们的数据将会被一起处理. query_hits 是从 ES 查询到的文档数量, already seen 指的是那些在前面的一个查询中已经被查询出来(buffer_time > run_every 导致查询时间窗口重叠), 这些将会被忽略. matches 指的是匹配了 规则类型 之后的输出文档数量, alerts sent 指的是实际发出的 告警 数(可能配了多个告警器). 这可能会因为 realert 、aggregation 选项或者一个错误导致 matches 有差异.
Sleeping for 297 seconds
默认 run_every 是 5 分钟, 意味着 ElastAlert 将会陷入 sleep 直到上个周期的运行过了 5 分钟才会执行一次从当前时间到 5 分钟之前的范围查询.
假设, 在接下来的 297 秒内, ES 中又增加了 45 个匹配的文档:
INFO:root:Queried rule Example rule from 1-15 14:27 PST to 1-15 15:12 PST: 51 hits
...
INFO:root:Sent email to ['elastalert@example.com']
...
INFO:root:Ran Example rule from 1-15 14:27 PST to 1-15 15:12 PST: 51 query hits, 1 matches, 1 alerts sent
邮件正文将会包含如下内容:
Example rule

At least 50 events occurred between 1-15 11:12 PST and 1-15 15:12 PST

@timestamp: 2015-01-15T15:12:00-08:00
如果出现了一个错误, 例如 SMTP 服务不可达, 你将会看到:
ERROR:root:Error while running alert email: Error connecting to SMTP host: [Errno 61] Connection refused
请注意如果你停止 ElastAlert 然后过一会再启动它, 它将会查询 elastalert_status 然后从上一次查询的结束时间开始查询. 这是为了防止当 ElastAlert 重启的时候发生重复告警或者遗漏告警.
使用 --debug 而不是 --verbose, 邮件不会发出, 取而代之的是打印日志. 另外, 查询 ES 的动作不会被保存到保存到 elastalert_status.